Search This Blog

Sunday, April 17, 2011

Pin Stripe and Clear Coating of Vehicle for Finished Look

Alright everyone we are down to the final stages of paint for your car.  These last stages are the best because this is when you actually see your car coming together as far as appearance.  Just for a recap:  we have stripped the original paint off the car, next we prepped the car with primer and bondo to get out all the dents and dings, wet sanded it after the primer dried, then we sprayed the car with the base coat paint and allowed it to dry in a room free of dust and other particles that can land on the dry paint.


Stage 7:  Now that we have allowed the car to dry is when we use a pin stripe to separate the colors.  The pin stripe is just a color that goes from one end of the car to the other end to separate the paint and give the car a distinct look.  Some car companies use a vinyl strip of color that is added on as the final stage of the paint job.  The only problem with that is that the strip can be removed from the car easily cause that strip is actually glued to the outside of the paint and can be peeled off or over time of washing the car can fade away.  So The best way to do is how we are doing it now, which is paint the strip by hand.  This step is a very difficult one in that the person painting it needs a very steady hand to keep the line as straight as possible to give a great finished look.  Once the Pin Stripe is painted on the car it needs to dry for at least a day.

Stage 8: Now that we have the base paints on the car and the Pin Stripe dry, we then go to the clear coating of the car. This Stage brings out all the color that has originally been painted on the car. As you can see in the previous stages were the base paint was painted on, its looks really dull and dry that's only because it is the base paint. The car is placed back into the booth and is sprayed with a clear coat of paint. A clear coat paint is a coat of paint that has no pigment giving it the ability to be seen through. There are also additives in the paint that bring out the colors that are beneath it (the base paints) and also provides protection from the UV rays that can dull the paint.  This process is also a long one because in order to give your car the shine you want you need to paint multiple clear coats on the car.  In this case the car was shot 3 times with 2 gallons of clear paint.  After each coat that is shot on the car you must allow the paint to dry before the next coat is shot on the car.  This process can take up to 3 to 4 weeks depending on how many coats of paint are shot on the car.


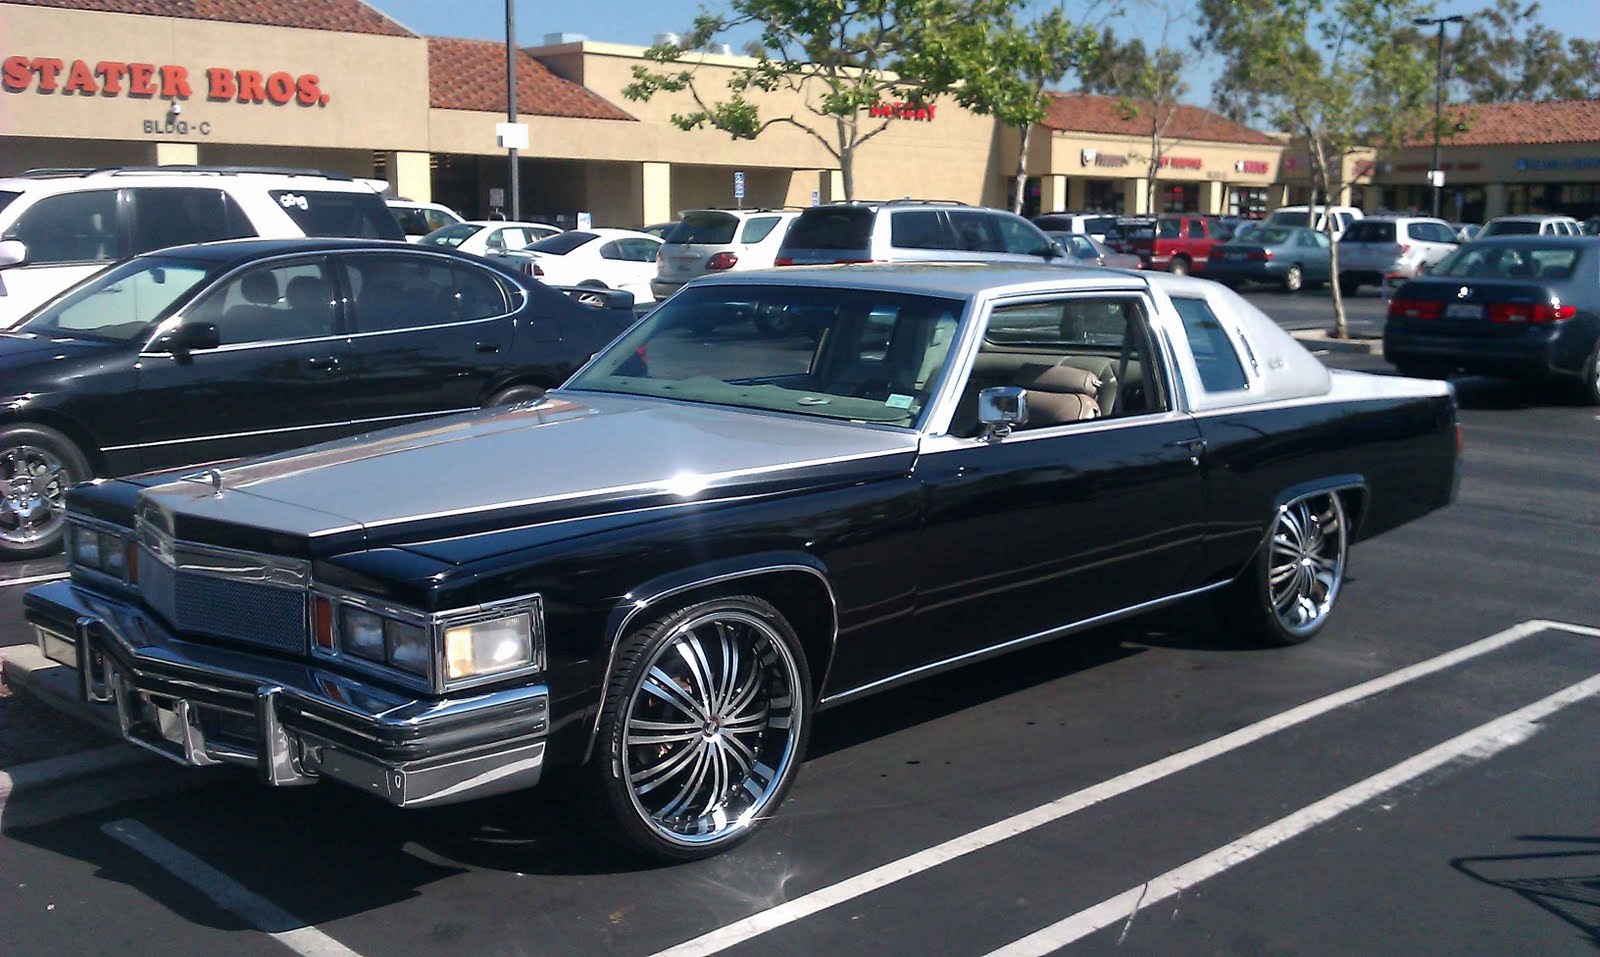
Stage 9:  For the finish we have all been waiting for we are at the final stage which is water sand and put the car back together to give your car appearance one to be seen.  Once the car the last coat of clear is shot on the car and is dried in most cases the car has an egg shell look that occurs after the final clear coat.  The look that is looked for is glass look when you look into the car, so to remove the egg shell look you must water sand the car.  Water sanding is the same as in stage 4, you will sand the car with a mixture of a fine peace of sand paper and water in one area of the car at a time.  Once the full car is water sanded down the egg shell look should be completely gone is when you give the car a good waxing on the car.  The waxing on the car is just a basic wax that you put on the car to give your car a good smooth and clean feel just like when waxing any car.  To finish up all the pieced that were removed from the car is put back on the car.  In the case of this 1979 Cadillac Coupe De ville all the chrome pieces and moldings including the bumper where re-dipped in chrome to take it back like it was new, and to spice it up a little bit threw on some 22" chrome and black wheels on the car and a new vinyl top.
 
There are many online sources to figure different things that can be done to your car from the engine, exterior, interior, performance, etc.  The website that i recommend is www.cardomain.com where there are hundreds of different makes and models where people fix up there rides so many different ways.  Then people from all over look at your profile and rate your car out of the cars in your category, and my car ranked in the top 5 in Cadillac Coupe De Villes on this site.  You can check out it out at http://www.cardomain.com/ride/3380956/1979-cadillac-deville.

Saturday, April 9, 2011

Spraying The Base Coat Colors

Ok car fanatics we are back to the fun stages of actually seeing your car transform right in front of your face.  The next couple of stages i would say are the best stages because you will be able to see the full potential of what your ride is capable of looking like.


Stage 5:  Once your car is dry and all dents are knocked out is when you start taping the car off for the first shot of paint.  When shooting a two toned car you need to tape of the car in areas to separate the paints that are gonna be shot on the car. Also when taping off the car you want to identify the angles of the actual body of the car that way when it is 
painted the curves and shape of the car will stand out.


Stage 6:  This is repeat of stage 5 just in reverse, where the top half of the car is completely covered taped off to shoot the black coat on the car.  After this step you can see the car start to transform to what you expect.  Stage 5 and 6 are both just the base coat on the car so the colors are gonna look really dull but that's just because it is not finished completely yet.  After these two stages are complete you want to allow the car to dry completely before you go to the next stage.

Sunday, April 3, 2011

Preperation For a Great Paint Job

For all you car fanatics out there, this is a step that is a must in making your car look its very best.  The topic for this blog today is the paint job.  This step is usually done last because when you have a fresh paint job you don't want it to be around anything that can damage it.  After the paint job the car should be ready to hit the open road to show the world.

So lets hop right in, there are many steps that need to be done in order to insure a great paint job.  The first tip and a really important one is not to rush the paint job.  It is a long process but after they are all followed you will be satisfied with your paint job.

Now to get started here are all the steps to have an excellent paint job:

Step 1:  Find the car that you want to restore, and if possible when picking the car try and get the car with the least damage.  That way when you are fixing the car you will have less to repair when painting the car.  The things to look for are dents, rust, and frame damage.  All of these can be fixed but the less repairs needed the less you will need to spend.

Step 2:  The car must be sanded down completely removing all the paint from the car.  Once it is sanded down you will see all the dents that need to be removed from the car. 


Step 3:  For this step you will need to add bondo which is an adhesive that will act as a filler for any cracks or areas where there might have been rust at.  When all areas are filled is when you will then apply primer to the car which helps the paint stick to the car.  This is the step that will need time to allow the bondo and primer to dry on the car.  A good week will ensure the bondo and primer to dry completely. 


Step 4:  Once the car is completely dry you will then water sand the car to smooth out all the rough edges to give it a smooth finish.  During this process you will need a fine peace of sand paper and water, during this process you will be able to see any dents and dings in the car that need to be removed.  This process is also a long one and to ensure the smoothest finish it should be done in sections that way no area is missed.

Sunday, March 27, 2011

Ground Control - Suspension

Hello and welcome to the suspension discussion of our blog, so lets jump in. In todays technological vehicles the suspension system is a vital part in getting the power to the ground. Or, if you would rather ride in comfort there are plenty of air bag options to smooth out that rough ride.

With todays technology the options for suspension upgrades are limitless. If your looking to get the power to the ground here are some options to consider. Coil over shocks are a great upgrade for any old school ride, not only will the vehicles not bounce everywhere but it will help stabilize the car for better handling and control. A bigger sway bar will also help with traction control, keeping the car from twisting and swaying in the turns or off the line. A four link in the rear end keeps the rear end from twisting and will help with keeping the power to the ground.

If comfort is more your style, air bags are the way to go. There fairly easy to install and give your vehicle the smooth but not bumpy ride your looking for and are great for long road trips. When it comes to improving your vehicle's performance, shock absorbers are probably one of the last things you consider. However, shock absorbers as an integral part of your vehicle's suspension, work to maximize the ability of your tires to perform.
The springs in your suspension hold up the weight of your vehicle and help resist pitch to the front and rear, and (in conjunction with the vehicle's sway bars) resist lean to the side. Your shock absorbers are the primary suspension components that actually help "absorb shock" preventing continued bounce every time you accelerate, stop, corner or hit a bump. Shock absorbers are designed to slow and reduce these movements to help control the weight of the vehicle during transitions and allow your tires to perform better as they accept your input.

When shock absorbers wear (often very slowly over tens of thousands of miles, making the deterioration less noticeable), their resistance to movement weakens, your vehicle's handling suffers, and tires and suspension components wear abnormally. New shock absorbers can restore the performance that has been surrendered by weak shock absorbers on used cars. Even new cars can improve their performance by upgrading their shock absorbers.
Shock absorbers work by converting suspension movement (kinetic energy) into heat (thermal energy). Fluid in a telescopic shock absorber is forced to pass through restrictive valves as the shock's piston is compressed (bump stroke) and extended (rebound stroke). Many shock absorbers are gas-filled to reduce foaming as their piston is forced through the fluid, and have a "floating" piston to separate the fluid from the gas. This helps eliminate performance fade to maintain good ride and handling characteristics, even in demanding driving conditions.
BEFORE

AFTER [LOWERED]


Most "heavy-duty" shock absorbers, by means of larger diameter rods and pistons, better seals and valves, more fluid, and stronger mounting points, are stronger and better suited to the demands of hard driving, than are Original Equipment shocks. Some performance shock absorbers are adjustable allowing the driver to tune the behavior of the vehicle to meet their preferences for ride comfort and handling balance. This feature also allows the driver to adjust the shock absorber's dampening to compensate for the wear that occurs over tens of thousands of miles.

Sunday, March 20, 2011

Stopping Power - Brakes


Brake system upgrades are a popular performance enhancement. Whether it's to improve the appearance of your vehicle after installing open-spoke wheels to improve stopping ability on the track or to shorten stopping distance for safety's sake, many brake upgrades result in a larger brake system rotor or caliper, or both. While looking good and filling out the space behind the spokes of your wheels, these larger brake system components
In this article, we'll examine the ins and outs of brake upgrades. We'll look at why you'd want a brake upgrade, some of the parts typically replaced in a brake upgrade and the types of upgrades possible.
The politically correct reason for wanting to upgrade your brakes is improved performance. Higher-quality brake parts can last longer, decrease stopping distance, perform better under extreme conditions and, as a result, improve your vehicle's safety. Of course, if you're trying to show off (without really looking like you're trying), nothing says performance more subtly than a set of big, vented rotors peeking out from behind custom rims.


pose a challenge to the wheel fitment. Original Equipment wheels installed at the factory were not designed with larger brake components in mind, and rarely allow sufficient clearance in diameter and behind the spokes for a performance brake upgrade. The increased diameter of the brake rotor will often dictate using larger diameter wheels, sometimes as much as 2-3" larger. Because the caliper is often changed as part of the upgrade, consideration must be given to the size and shape of the new caliper, which will encroach on the space directly behind the spokes or face of the wheel. The combined shape of the new rotor and caliper create a profile, which must be measured and compared to the space behind the wheel to determine if sufficient clearance exists. But it's important to remember that larger wheel diameter alone does not assure clearance around the brake components. It's the combination of diameter and profile, or shape of the wheel itself, that determine how much room is available for larger brake components.

In addition to brake upgrades sold as aftermarket components, a number of vehicle manufacturers offer special edition vehicles that come with larger, upgraded brake systems right from the factory. 
The objective of Autocross/Track pads is to provide extreme stopping power and withstand high levels of heat to resist brake fade, even after repetitive high-speed stops. Because of their unique formulations, these pads usually need to be warmed above ambient temperature before they're able to provide their maximum level of stopping power. While fine for high-speed track events, lapping days or wheel-to-wheel competition, these pads may cool off too much between stops on the street and possibly provide less initial stopping power than O.E. brake pads. With the increase in ultimate stopping power can also come a significant increase in required pedal pressure, pad and rotor wear, noise and brake dust – none of which are desirable during every day driving.


Sunday, March 13, 2011

Built For Speed Or For Comfort? Part II

Hey Everyone and welcome to the second part of built for speed or for comfort? In this blog we are discussing performance modifications. So lets jump in.


After the proper diagnostics have been performed on the engine to make sure its in good condition or if it needs to be rebuilt we can get into these mods. Lets start with machining the block. Here are a couple of things you can do:

  1. Boring out the cylinders will increase volume within the cylinders which means more air/fuel mixture resulting in more power. The over boring sizes range from .010-.060 over (caution .060 is the biggest you want to go because the cylinder wall will be to thin and cooling issues will occur).
  2. Decking the block lowers the surface where the heads meet the block. This is done at very small increments, by thousands of an inch. This will increase the compression ratio and better atomization within the chamber.
  3. Boring out the intake and exhaust ports will increase air flow, which will increase power.
Now that the block is clean and machined lets talk about internal parts. To  make sure your parts are going to be strong and durable look into a forge crankshaft and rods. They are an increased cost, but are an optimal choice for the long run. Aluminum pistons are a valuable feature; they are light weight and durable.  When purchasing the new pistons ensure you get the correct piston rings with the corresponding over boring size.

Next on the list would be the heads. They do have heads that can be ordered, from performance parts stores like Summit, with all the attached bells and whistles . Another option is to get the heads machined with over sized valves, this will allow more air flow and increased power. To increase valvetrain efficientcy, roller rockers are a good investment. Believe it or not there is a lot of power that is lost in the valvetrain and roller rockers will deduce friction.


In conjunction, with improving the heads, getting the exhaust redone with help the engine breath and overall performance. Headers are an easy modification to increase horsepower and torque that any weekend mechanic can do can. Although some people like to designing their own exhaust systems there are some companies like heartthrob exhaust that make easy bolt in systems for a descent price.

That will conclude todays brief overview regarding options that can take your car to the next level of performance. See you next time.


Saturday, March 5, 2011

Built For Speed Or For Comfort? Part I

    Good day everyone and welcome to the second blog of Weekend Mechanics. Today's topic: engines. Now when it comes to engines, the first question is bound to be, "Is the engine built for comfort, or for speed?


    Initially, when asking yourself this question about your engine, you need to consider whether or not you want to rebuild the entire engine block, or add performance to your existing engine. If you are looking to build upon your existing block let's first go through some check points to find out if the engine is in good operating condition. If you are looking to rebuild the engine completely that will be covered in part two.
    First, you must always check the oil; Pull the dip stick and observe closely the condition of your oil.
  • If oil is black the engine was neglected and could possibly have further damage.
  • If oil smells burnt: improper lubrication can be the cause, with the rod or the main bearings.
  • If the oil smells like fuel, this could indicate worn piston rings or cylinder wall.
    Next, drain the oil and look for any metal shavings (a small amount is normal) but if the oil sparkles, then excessive wear and tear is the cause and the engine would need to be rebuilt. Fill the engine up with oil.
The next step is to pull a spark plug and check its conditions:
  • Burnt (black)- improper burning, burnt exhaust valve, fuel ratio is too rich.
  • Porcelain cracked-   pre-ignition or detonation
  • White- coolant leak inside cylinder
    After you have pulled and checked all the plugs, this would be a good time to do a compression test. If you do not have a compression tester, you can rent or buy one from your local motor parts store. In order to do a compression test, you need to find out what the compression ratio is for your specific vehicle; it can be found in the repair manual which should be located in your vehicle's glove box.

     To perform a compression test:
Pull the ignition wire going from the coil to the distributor cap to prevent spark through the wires.
Thread the tester into the spark plug hole and crank over the engine let it crank over 4 times.
Watch the needle and record the reading do this three times for each cylinder. The compression for all the cylinders should be around the same with only a 10% difference between the lowest and the highest recording. This indicates:
  • Proper sealing of the piston rings
  • Intake and exhaust valves are working and seating properly
  • The head gasket is in good condition

    Another required test is a vacuum test. A vacuum gauge which can be found at your local parts store is needed. After you have put the spark plugs back in and replaced any that are damaged hook up the vacuum gauge by simply attaching it to an existing port located on the intake manifold or at the base of the carburetor. Start the engine and watch the gauge. Here are some reading to help with figuring out what your looking at:


   Now that the basic engine tests have been performed you can determine whether or not it might be easier to rebuilt or to add performance to your existing engine. In part 2 the discussion of those performance parts and the building of the engine will occur.

Sunday, February 27, 2011

The Basics

Welcome to our Automotive Restoration Blog. If you are ready to get greasy, you have come to the right place.
In this initial blog post, I would like to go over some of the very basic knowledge regarding this topic.
After you have chosen your set of wheels regardless of it being an import or a domestic automobile, the primary step in car restoration is to make a list of what is required to be done and to plan out the project. You don't want to overlook something essential and risk damaging a new paint job, or find out that your car looks striking but won't run. Go around the entire car and make notes as to the repairs and other restoration processes. 
Here are some of the many things to include on your list:
·         Seats: If the seats are torn or worn, look for used seats from a junkyard. If you cannot find decent used seats, think about recovering the seats.
·         Headliner: Be sure that the headliner is not sagging or torn. You can order headliners and install them yourself. If you are not comfortable installing a headliner, some detail shops provide this service.
·         Carpet: Change any carpet that is worn or dirty.
·         Dash: If the dashboard is cracked, and it is a very common issue on aged cars and it must be replaced.
·         Rubbers: Check all of the rubber on the car, include the trunk rubber, the window rubbers and the rubber stops for the hood and trunk. If you find cracked or rotted rubber, start looking around for signs of rust in the floor pans and side panels.
·         Dents and Scratches: Make sure all dents and scratches are filled in or pounded out. Paint the car with black primer to make dents and scratches show up better. The black primer can be removed later.
·         Engine Compartment: Spray wash and clean the entire engine compartment. Add chrome accessories to the engine compartment to "shine it up."
·         Engine: Make sure everything is working. Park the car over some white poster board for a day or two to look for leaks. If it leaks, raise the car and find out where it is leaking from and how bad or worse are the leaks. If the car has been sitting idle for an extensive period of time, think about replacing all belts and rubber gaskets.
·         Wheels and tires: If the wheels are shabby, you can replace them. Some wheels can be cleaned up or polished so they look new again. You can also opt to paint or powder coat the wheels.
This is only a fractional list. As you look at your car, make a note of anything you want to replace and everything that needs to be repaired or freshened up. After you create the list, start calling local speed shops and auto parts stores to price out the items you need. You could also jump on the internet and save hundreds by buying the parts from wholesalers or from the source. Sometimes, even with shipping costs, the part is less expensive to order than to buy locally. Make three columns on a blank sheet. Call at least three places for each part needed; this helps you find the best deal on parts.
Planning the Project
With your list of repairs is in hand, you're ready to undertake the major chunk of restoration process. It's best to proceed in the following order:
·         Transmission: If there are problems with the gears or clutch, pull the transmission out first and get it running properly. Have it rebuilt if necessary. Drain the old fluid and replenish with new fluid. Replace the clutch and all gaskets if you need to pull the transmission.
·         Engine: Make any needed changes or repairs once the transmission is back in place. If you'll be driving the car while you restore it, don't worry about chrome accents at this point.
·         Electrical: You may need to rip apart pieces of the car to run replacement wires. Do this step once you're sure the engine and transmission are in perfect shape, so that you'll know any electrical problems are the result of wiring and not mechanical issues.
·         Suspension: Begin any major suspension changes before you get too far into bodywork. This will involve mainly replacing all rubber bushings, links, shocks, struts and springs.
·         Interior: While you can attempt the interior at any time, it's best to do this before you start work on the body, especially if you'll be removing seats or replacing the dashboard.
·         Body: Don't start priming and painting until all other elements of the car are sound. You can add chrome elements to the engine compartment at this point as well.
·         Wheels: Wheels and tires can be replaced at any time. These can be expensive parts, so wait to buy them until after you've dealt with any mechanical problems.

In the next coming blogs, we will discuss each component in detail. We will pick American classic car, European exotic and so on to use them as an exemplary. Stay tuned in for more dirty work that is worth the payoffs.

BEFORE RESTORATION:


AFTER RESTORATION: